A product demo shows visitors how your app works before they sign up. Most sites use a screen recording. This guide shows another way: a demo made from screenshots, with a cursor that clicks and types by itself. It uses Autodemo, a component from vicsek studio.
Why not a video
- A video goes out of date. When one button moves in your app, you record the whole video again. With screenshots, you replace one image.
- A video is hard to read on a phone. Autodemo zooms in on each step, and on small screens the caption moves under the screenshot.
- A video does not match your site. Autodemo uses your accent color and the font of your app for the typed text.
What you need
- A Framer project. Any plan works.
- Autodemo. After you buy it, the component link arrives by email.
- One screenshot of each screen you want to show. A demo can have up to 20 steps.
1. Take your screenshots
Take one screenshot of each screen, in the order a new user sees them. Use the same window size for all of them, so the demo does not jump from step to step. Fill your app with data that looks real, such as client names and amounts.
2. Place the cursor on the setup page
Open the free setup page and add your screenshots. For each step:
- Click where the cursor goes.
- Choose the action: Click, Type, Hover or Wait.
- Write a short caption, for example
Send the invoice. - Drag a box around the part to zoom into.
- Drag a box over anything private, to blur it.
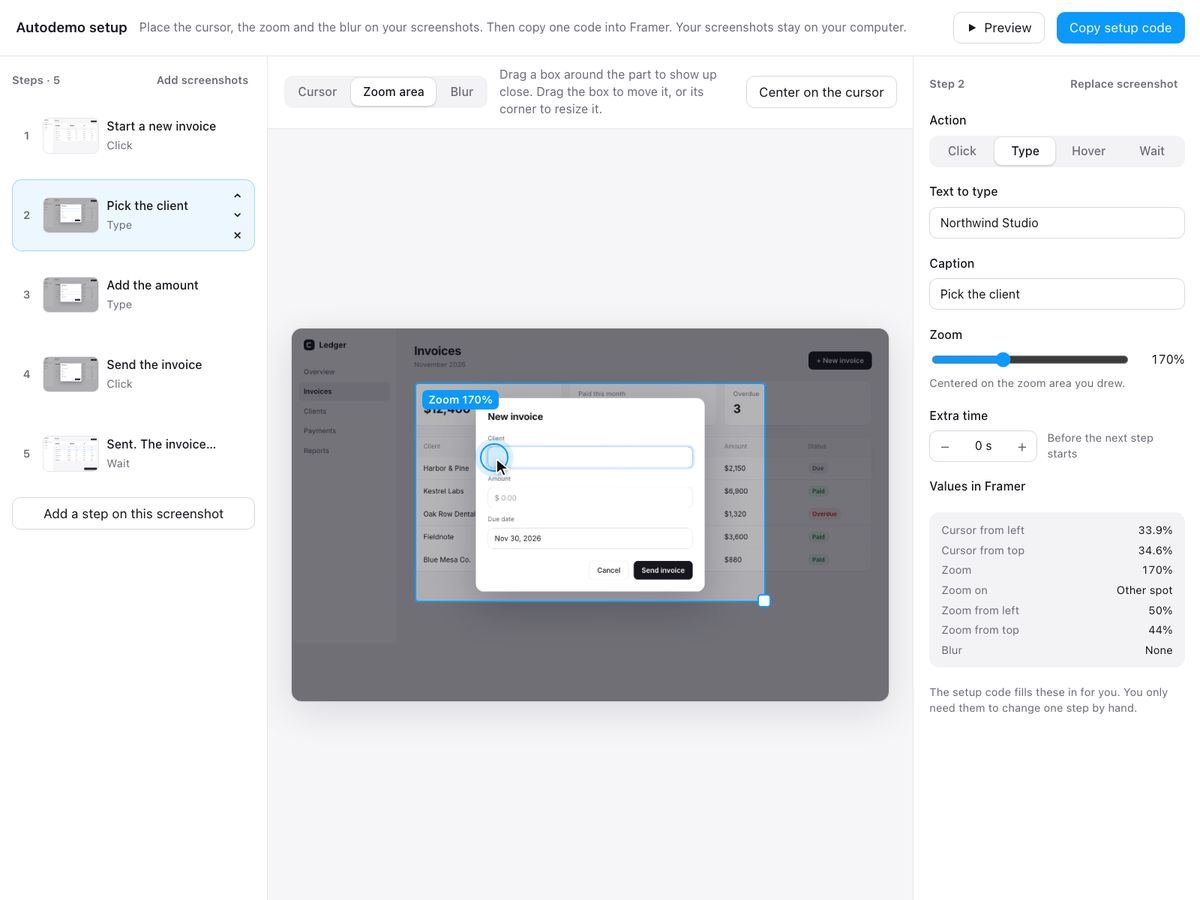
3. Paste the code into Framer
Copy the setup code. In Framer, paste the Autodemo link on the canvas, then paste the code into Setup code. Add each screenshot under Screenshots. The order does not matter, because Autodemo finds the steps that belong to each screenshot.
To check one step on the canvas, set Show step to its number. You see a target where the cursor goes and a box around the zoom area. Set it to 0 to see the demo as visitors first see it.
4. Match it to your site
Try the frame and the cursor here. This is the real component.
- Frame. A browser window, a card, or no frame.
- Accent. Colors the step bar, the click ring, the caption number and the end screen button.
- Starts. When the demo scrolls into view, on hover, or on click.
- End screen. A button after the last step, for example a link to your sign-up page.
Questions
Does the demo play on phones?+
Yes. Phone zoom shows a closer view, and the caption moves under the screenshot so it stays readable.
How do I update the demo when my app changes?+
Replace the screenshot in Framer and publish. If a button moved, open the setup page, move the cursor, and paste the new code.
Can visitors pause the demo?+
Yes. Set Starts to In view and On hover to Pause. The demo pauses while the pointer is over it.
Autodemo
Screenshots of your app become a product demo that plays by itself. Paid once, yours to keep.